Shaft Runout
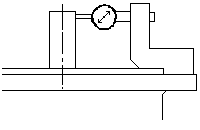
The shaft runout shall be measured with the indicator stationary with respect to the motor and with its point at the end of the finished surface of the shaft as illustrated in the picture below.
Read the maximum and minimum values on the indicator as the shaft is rotated slowly through 360 degrees. The difference between the readings shall not exceed the specified value.

Eccentricity and Face Runout of Mounting Surfaces
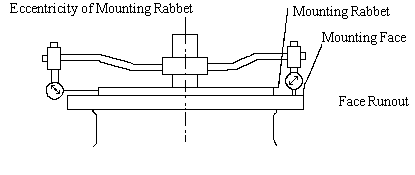
The eccentricity and face runout of the mounting surfaces shall be measured with indicators mounted on the shaft extension. The point of the eccentricity indicator shall be at approximately the middle of the rabbet surface, and the point of the face runout indicator shall be at approximately the outer diameter of the mounting face as illustrated in the picture below.
Read the maximum and minimum values on the indicators as the shaft is rotated slowly through 360 degrees. The difference between the readings shall not exceed the specified value. Our drawings always have the tolerance expressed in runout. Runout of mounting rabbet is always twice the eccentricity.
Eccentricity of Mounting Rabbet

NEMA Tolerances For Type P Vertical Solid Shaft Motors (MG 1-18.590)
| AK Dimension - Rabbet Diameter | Face Runout | Permissible Shaft Runout | |
| 182 - 286 | + 0.003 , -0.000 inch | 0.004 inch | 0.002 inch |
| 324 - 445 | + 0.005 , -0.000 inch | 0.007 inch | 0.002 inch |
Permissible Shaft End play .015 Max.
Industrial Standard Balance .001 inches (NEMA MG-1-4.23)
Our Standard Balance .00084
Special Balance .0005 inches.

